As a Christmas gift for my brother-in-law Fenix asked if I would be up for building him Mjolnir, since he's a big Thor fan. "Why not?" I thought. "It's just a simple hammer." Hammer, yes. Simple? No.
Materials:
- 3/4" PVC pipe (2')
- 1" PVC pipe (2' though I probably only needed 1')
- XPS (AKA pink insulation foam)
- Apoxie Sculpt
- Leather
- MDF (AKA particle board)
- Mold Star 30
- Smooth-Cast 300
- Super Sculpey
- Hot glue
- Paper clay
- Wood glue
Tools:
- Sandpaper
- Leather sewing supplies
- Rotary tool with cutting, engraving, sanding, and polishing heads
- Jacksaw
- Drill
Time commitment: 25-30 hours
After looking closely at some reference of Mjolnir (specifically from the first Avengers film) I realized there were a lot of details to the hammer. Specifically the haft was more than just a stick wrapped in leather and the head was more than just a block of metal.
The Haft
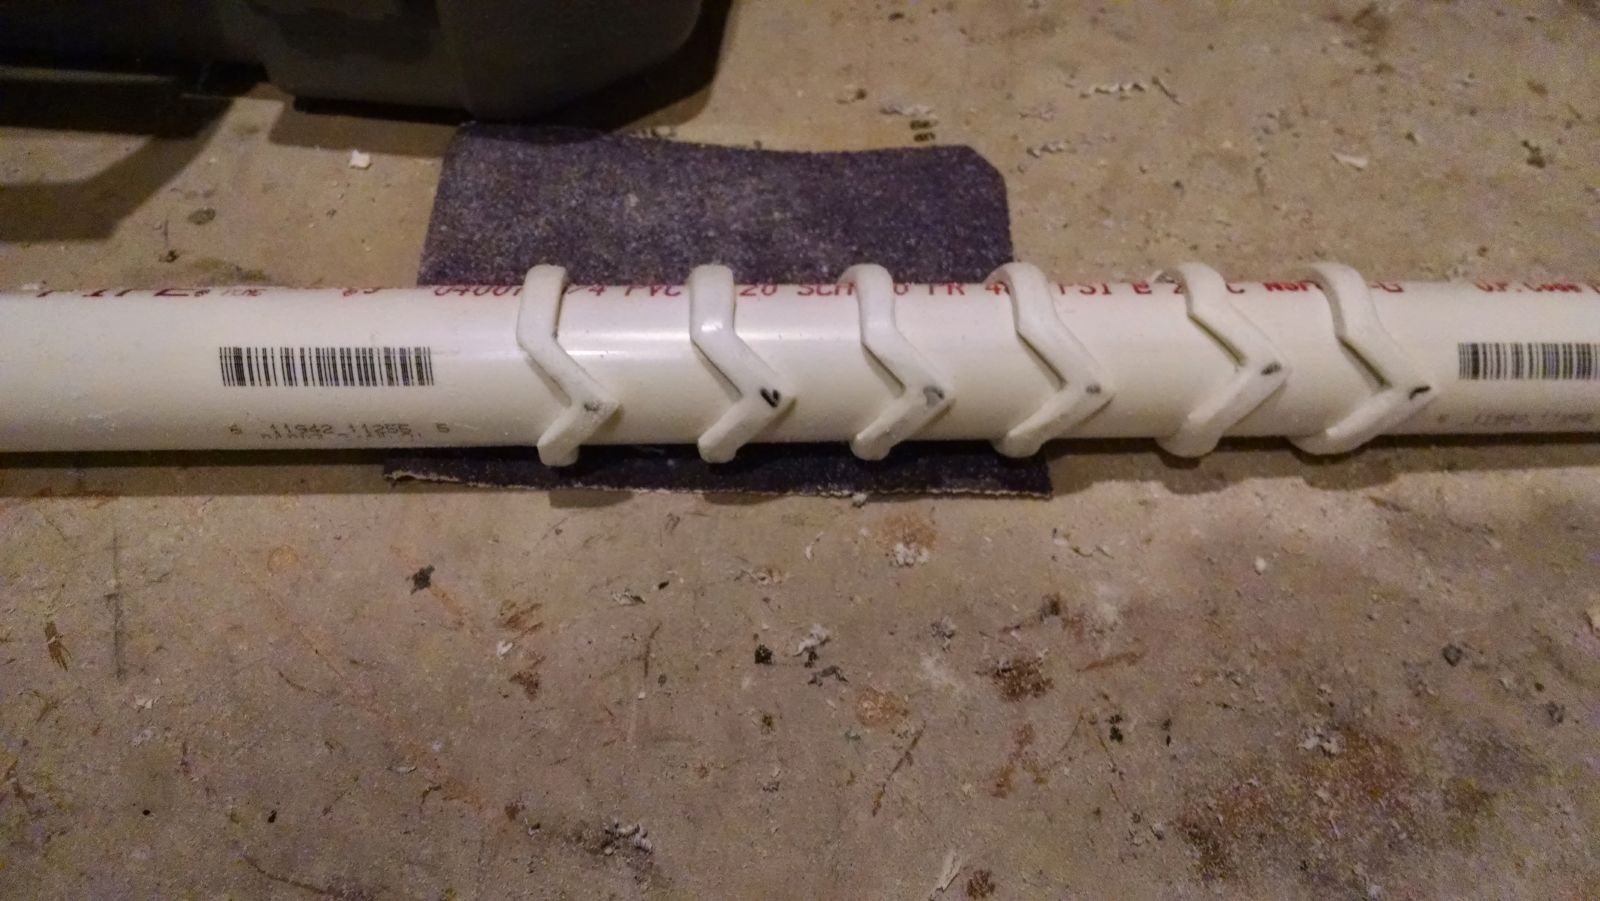 After analyzing the haft I saw it was a repeated pattern of raised sections capped with a piece of metal that the strap fed into. I decided to cut the repeated pattern out of one size of PVC pipe and slide it onto a PVC pipe of one size smaller. I started by patterning the repeated bit out in cardboard, wrapping the cardboard around my larger PVC and drawing the pattern on. I then cut the pattern out, taped it into a circle, and traced the pattern onto the PVC eight times leaving a healthy amount of space between each so that I had some wiggle room when cutting them out. I used my rotary tool with a plastic cutting disc to cut out the rough shapes of the patterns and then used the coarse sanding head to do the finer work. This was moderately time consuming, especially since I wanted each piece to look like metal, so after getting the shape with the coarse sanding head I switched to progressively finer sanding heads. After that I switched to a polishing head on my rotary tool and polished the PVC. Note that the 1" PVC doesn't naturally slide over the 3/4" PVC, so I also had to sand the inside of each piece so that they would slide onto the core piece of the haft. I wanted them to slide on but not be loose. I did that with all 8 pieces: rough shape, fine shape, sand, and polish.
 Once I had the repeated detail pattern done I had to make the two outlying raised pieces. Using the same cardboard pattern I had cut out previously I sketched out the shape for each end piece (using the sharp triangle for the top end and the smoother curve for the bottom) onto the 1" PVC. I then did the same process as before with cutting and finishing those pieces. I had to use an engraving head to cut out the inside of the triangle on the top-most piece, and as such I wasn't able to make it quite as smooth as I wanted.
With all of the detail pieces cut out I needed to actually cut the core of the haft out of the 3/4" PVC. I basically eyeballed the length of the haft by figuring that Chris Hemsworth fist is probably roughly the same size as mine and figuring out how many fists he could get on the haft. Then I added in the length of the head of the hammer and cut the PVC to that length. With the core cut out I sanded it down to get rid of that glossy PVC sheen, since it looks like the core of the haft is supposed to be covered in leather, maybe? It's unclear, but it certainly doesn't have a texture like PVC, so I figured sanding it and giving it some different texture wouldn't hurt.
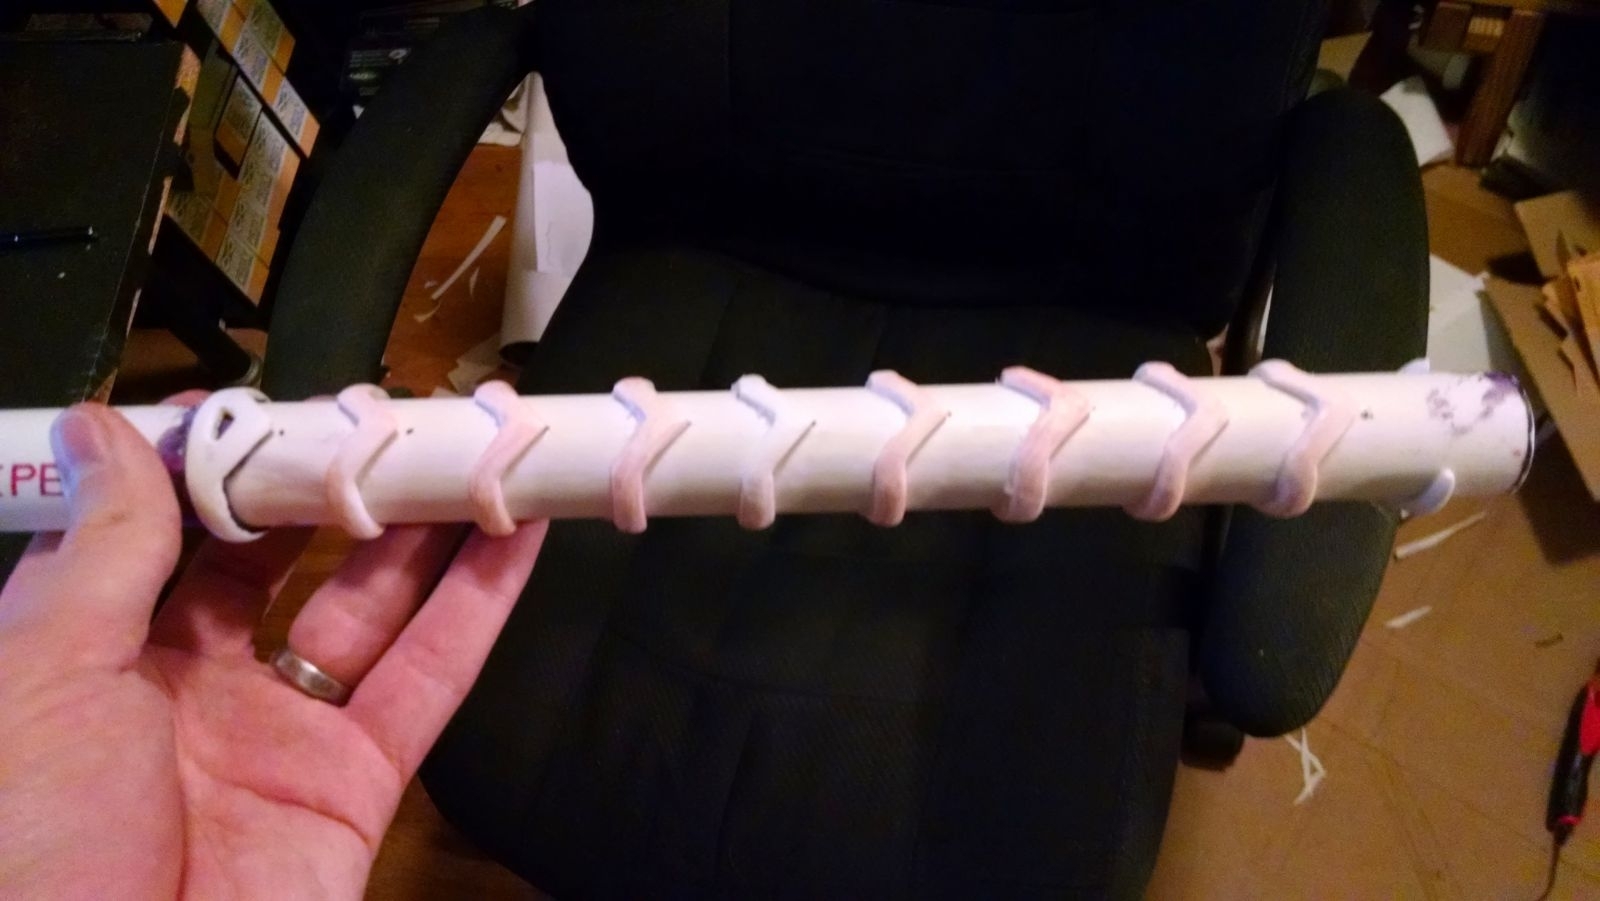
With that done it was time to glue the detail work onto the core. I carefully measured out the length of the revealed part of the core and subdivided it so each piece would be equidistance from the next, allowing for some space at top and bottom for the larger "metal" bits. With that done I glued each piece down. Initially I was going to use PVC glue but my PVC glue was completely hardened and I didn't have time to get to the store for more, so I fell back on good ol' reliable hot glue. I put just a smidge around the core where a piece should go, then quickly slid the detail work into place before the glue could cool off. It's important to make sure that your points line up. Thankfully I got it right in one, but if I hadn't I could probably have broken the hot glue, peeled it off, and just tried to re-set the piece a second time. Hindsight: My detail pieces extruded slightly farther from the core of the haft than the screen version's details do. I probably should have sanded them down a bit more to make it more screen accurate, but this is just me being nitpicky. With the detail work glued down it was time to do the "metal" ends.
For these I decided to sculpt them using Apoxie Sculpt. For the upper piece I just looped it around the haft and shaped it with my hands (and a sculpy tool I find useful). I tried to make the top as level as possible because the head of the hammer would need to rest on it seemlessly. For the bottom piece first I needed the piece of leather that would be used so that I would be sure to leave enough space for it to slide through. Fenix cut and stained a piece of leather scrap we had lying around and I sculpted around that. I took some minor liberties at this point just because it made my life a good deal easier to do so, but the shape I ended up with was pretty close to screen accurate. Again I just shaped the Apoxie Sculpt primarily by hand, making sure that the bottom piece enveloped the bottom-most piece of PVC detailing I had added (since it's supposed to be part of the same piece of metal). Once that was done I clamped the PVC upright overnight to let the Apoxie Sculpt cure. Apologies that I didn't have my phone around at that point to take a picture of this part of the process. The next day I sanded down these parts, taking some roughly symmetric pieces and making them as perfect as I could get. Sanding down the bottom especially made a huge difference and really made it look like something that might have been cast instead of hand-molded.
The leather strap was pulled out of the cured handle and then the haft was then handed off to Fenix to paint. Once she was done painting it we worked the leather back into the end of the haft and sewed it shut.
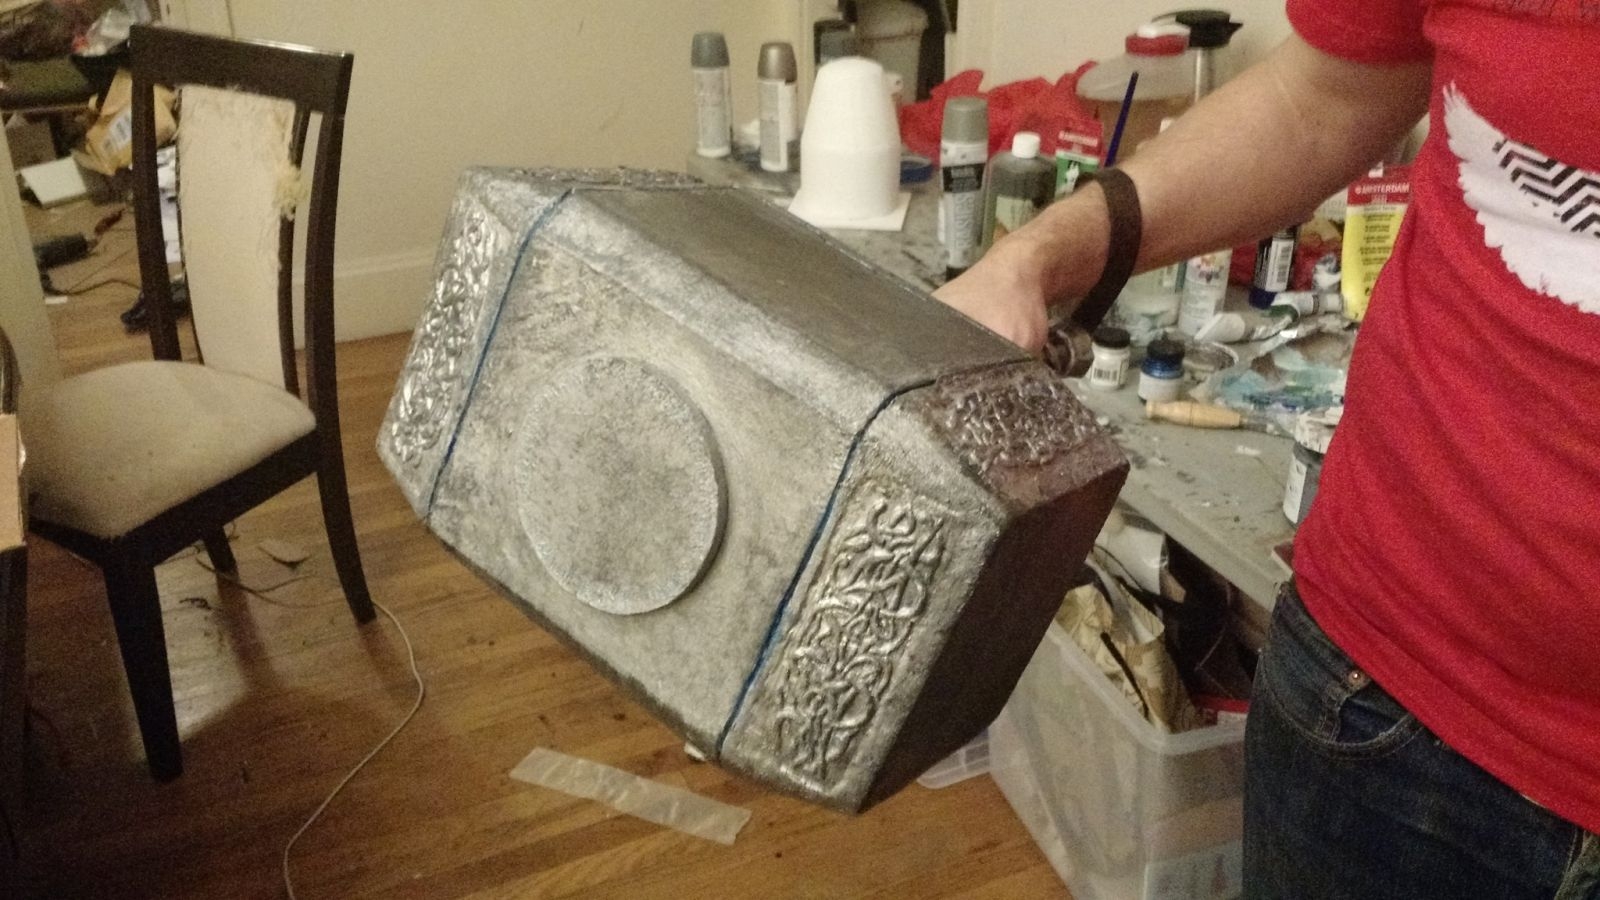
The Head
 The first thing that struck me about the head of Thor's hammer was all of the detail work around the edges. I mean, come on! Who has time for all that? Not me, that's for sure. Well, when prop-making, there's one way to do a real world copy-paste and that is by making a mold and casting duplicates. The first thing I did was I spent several hours painstakingly sculpting out the details in super sculpey. Once I had it to a point I was happy with each swoop and flourish I baked the sculpey. I then made a run to Reynolds Advanced Materials to procure the resin necessary for casting (I already had silicone around for the mold). I made a mold out of Mold Star 30 which was beautiful (minus some tearing on the edges as I was de-molding it; it meant I had to patch up the sides so that resin didn't spill out everywhere while I was casting, but it didn't impact the finished product). I then proceeded to cast 8 copies of it out of Smooth-Cast 300 I sanded the edges down with my rotary tool later to make sure each piece fit.
With the finicky details out of the way it was on to the "easy" part of the head. I made a pattern in cardboard, using some guesstimating scaling that I had already made use of for the haft (and to determine the size of the detail work I had just cast) and then transferred this to the XPS. I cut out three pieces of the XPS (since each piece was 2" thick and I had ended guesstimating the thickness of Mjolnir to be about 6"). Hindsight: I would have been better served to do this in THREE pieces instead of one; the middle piece and the two end pieces. The screen version of Mjolnir has the end pieces slightly smaller than the center piece, but that was going to be such a hassle once I got to that point (because I had made mine one solid piece) that I just decided to fuck it and put a channel to distinguish between the end pieces and the middle. While it's nitpicky and certainly not necessary if I had made them separately it would have been trivial to make the end pieces slightly smaller.
 After gluing the three layers of XPS together with wood glue (I find it sands WAY better than most other glues and doesn't react poorly to foam) and waiting for them to dry I found one of the pieces hadn't glued evenly. There was a bit of a gap. I filled the gap with a mixture of paper clay and wood glue (my go-to filler when working with XPS) and proceeded to sand the block into shape. I started by removing corners and made heavy use of a sanding block to try and get some nice flat sides. This was definitely a case of there not being such a thing as too much sanding; I wanted those sides flawless. With the sanding finished I switched my rotary tool to an engraving head and etched in the lines along the sides and across the bottom edges (after tracing them out with sharpie first). I had to be super careful at this step so that my hand wouldn't jitter and screw it all up.
With the block finished it was time to add the detail pieces to the ends. After sanding the edges down I traced a piece on the foam and then proceeded to carve out a recess for it. I had to do each one individually since they were all unique depths. I did this with the sanding head on the rotary tool; not the perfect tool for the job, but the best I had handy. I marked each recess with a number and the back of each cast with the same number so I knew which piece went where. After I had created each recess I glued the casts down with hot glue. Note: hot glue and XPS don't always play well together; if the glue is too hot it WILL eat through the foam.
With all of the details glued into place I found that I had gaps between the edges of the foam and the casts from where I had been a bit too aggressive carving out the recesses. I went back to my trusty filler of wood glue and paper clay, waited for that to dry, then attacked it with sandpaper. Note that on screen the detail work for Mjolnir's endcaps are slightly recessed, whereas on my version they are flush. This was by choice; I was worried that I would be able to get a crisp edge if I tried to recess the detail work, so I decided slightly inaccurate was better than sloppy.
At this point I figured out where the haft would be attaching and drilled out the middle of the head so that the PVC could fit. I wanted it to be snug. I also wanted it to go most of the way through the head, but not all of the way. After drilling out the hole and testing it with the actual haft I actually had to shorten the haft slightly so that it all lined up properly.
The only part left for the head of the hammer was the very top. I wasn't sure what to make it out of, but after looking at the relative thickness I realized I had some MDF that was about that same thickness. I quickly cut out a piece of MDF (after first figuring out the size with some cardboard patterning), sanded down the edges, and added the Nordic runes along the edge. I had to sketch those out several times before I was able to get the sizing and spacing correct such that they fit around the edge. Once I had that down I used an engraving head of my rotary tool to engrave the runes. Hindsight: MDF doesn't take fine details well. If I were working in a piece of hardwood I bet this would have been fantastic, but MDF crumbles when it gets too thin. While it managed to hold up well enough I may have been better suited to using some sheet PVC I had laying around instead of MDF, or maybe even my initial plan of forming a disc of Apoxie Sculpt, letting it cure, sanding it smooth, and then engraving that. If I had more time to wait for the Apoxie Sculpt to cure I would have gone with that. In the end it didn't matter, since the runes were mostly lost in the paint job, making them more the HINT of runes.
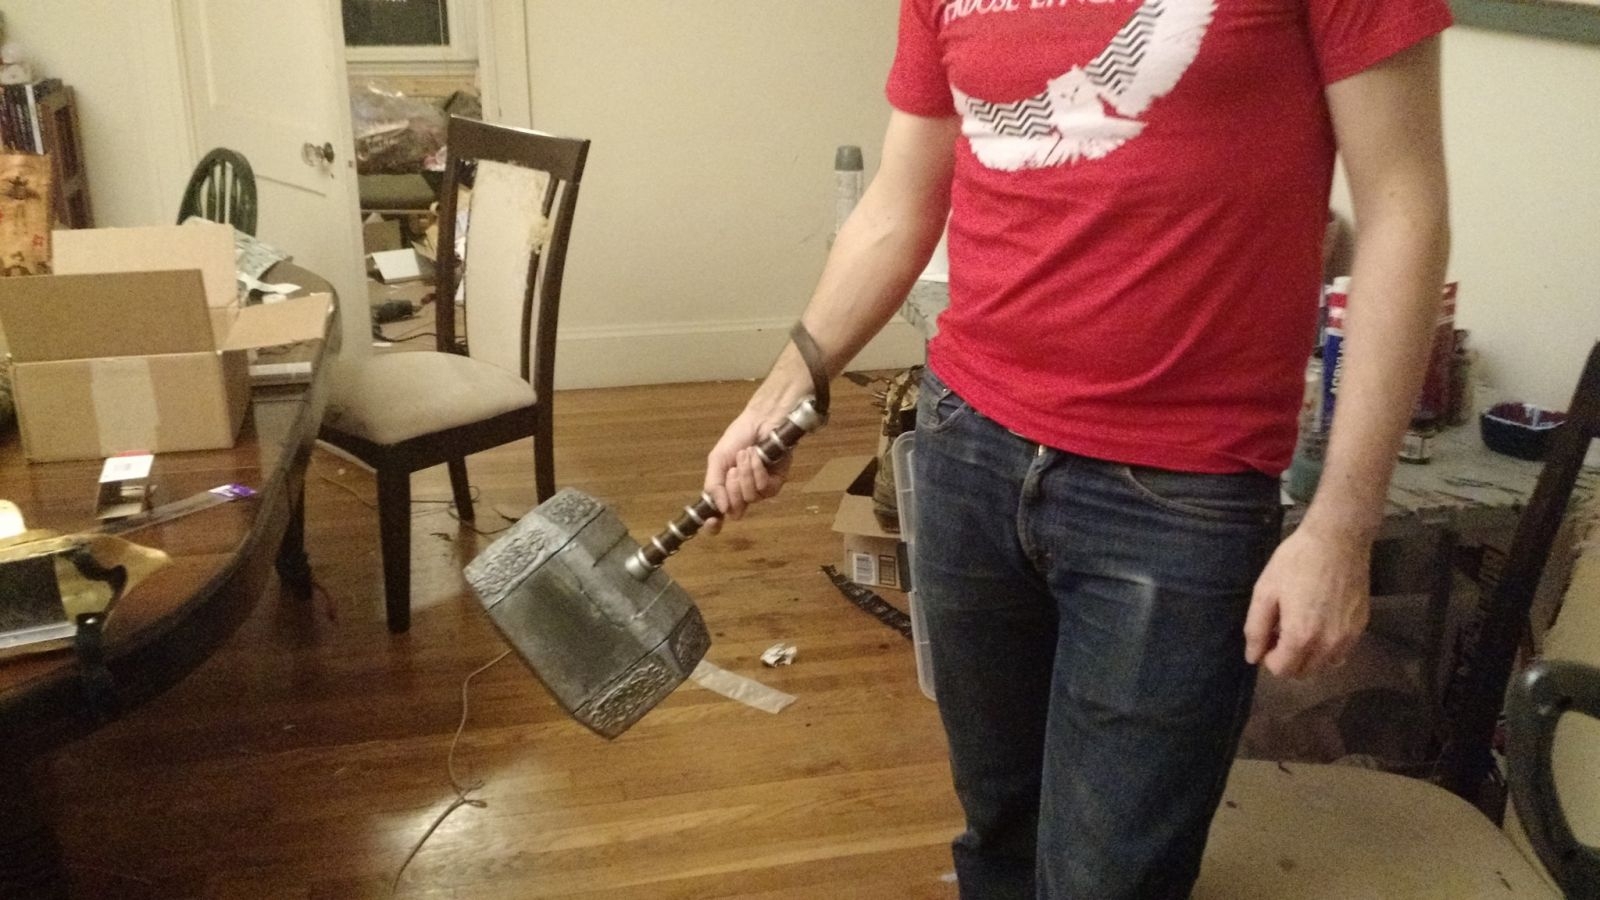
After the head was completed I handed it off to Fenix for them to work their painting magic. Once it was primed, painted and sealed I slathered the top of the haft with hot glue and shoved the haft into the pre-drilled hole. Once the glue dried the hammer was finished!
The Finished Product
This hammer should be fully convention-friendly, though as far as I'm aware it will only be a show piece. It's extremely light, but it's also somewhat fragile. Since the head is almost exclusively XPS it could be easily dented. Again, since it's going to be a show piece owned by an adult I'm not worried, but I would be careful if it were taken to a convention. I also wouldn't give this hammer (or a duplicate) to a kid as a gift because it would end up broken in less than a day. A few shots before wrapping it up:

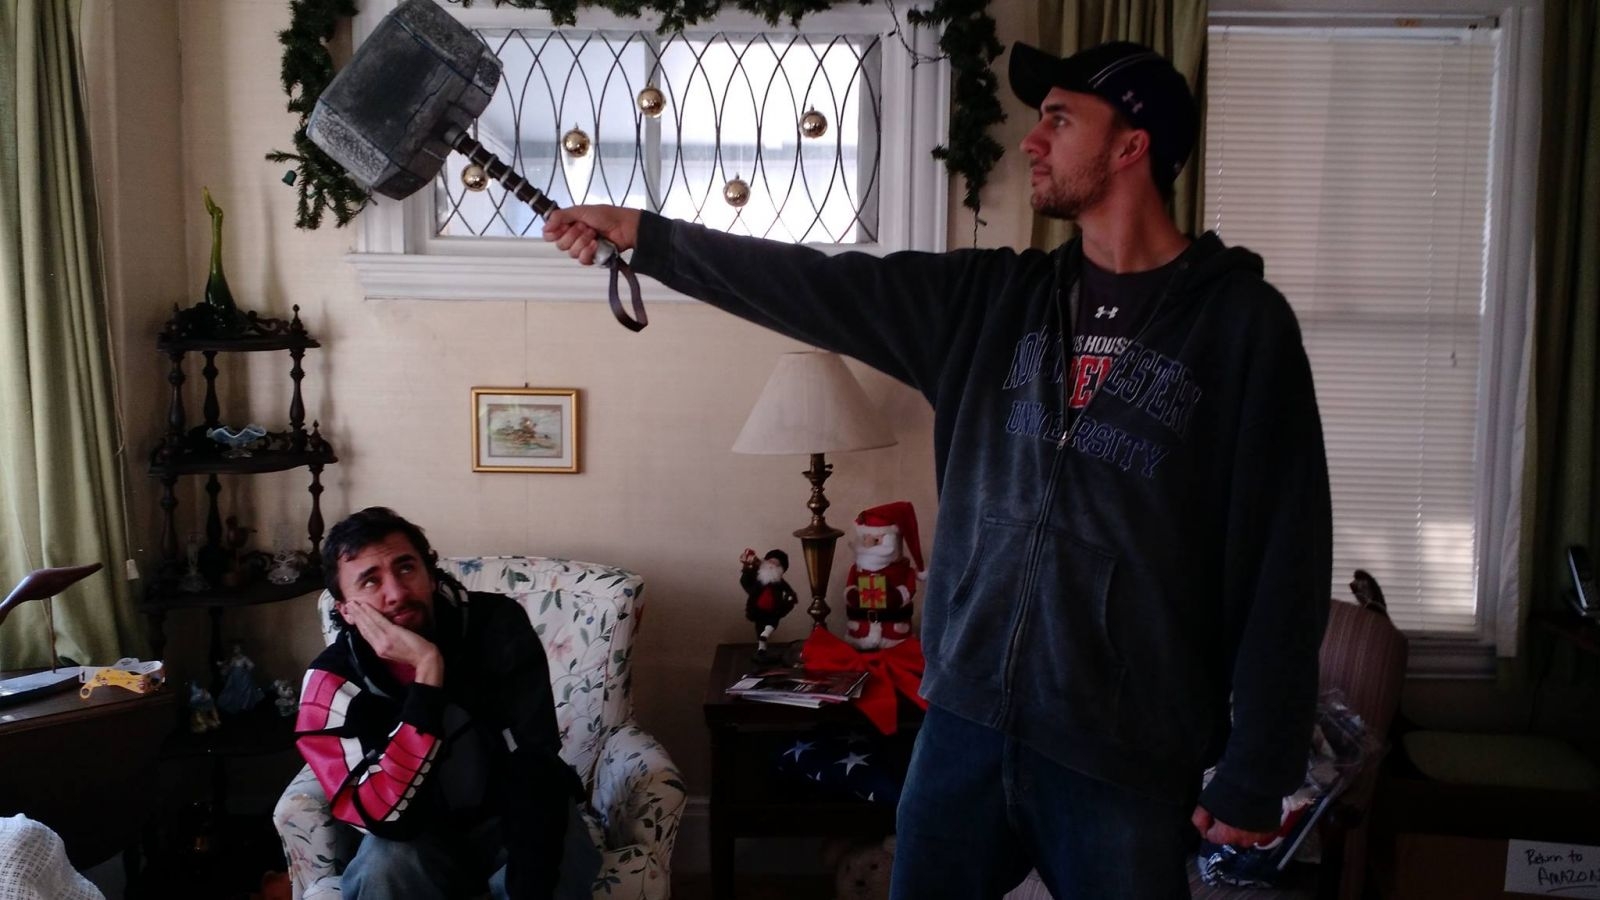
And one of it being enjoyed by my brother-in-law, Matt (while his twin brother, Greg, looks on after having been found wanting by Mjolnir):